
These days many appealing and unique businesses are going live on digital platforms with engaging features to offer users, these businesses are growing which make possible to use wide range of online payment portal. Payment gateways offer solutions that enable instant payment, security, and credibility for customers and merchants. Merchants install and integrate a payment gateway in their system to accept payments and provide the best user experience.
In this blog, we will learn the step-by-step procedure for integrating the Segpay payment gateway in your web application. Let’s get started.
Step by Step Guidance for Integrating Segpay:
Here are 4 steps for successfully integrating segpay in your application.
Step 1: Signup to Segpay merchant portal :
The first and foremost step is to signup to the segpay merchant portal. After signup the segpay support team will contact you via email, asking for your merchant ID that you have to provide them, without a merchant ID you won’t be able to access the dashboard after you provide your merchant ID segpay tech support will give you access to your merchant portal dashboard.
Step 2: Add your website and price points :
After you gain full access to your merchant portal first navigate to My Websites > manage website, there you would be adding your website URL and details. You can get more instructions about managing websites on this page.
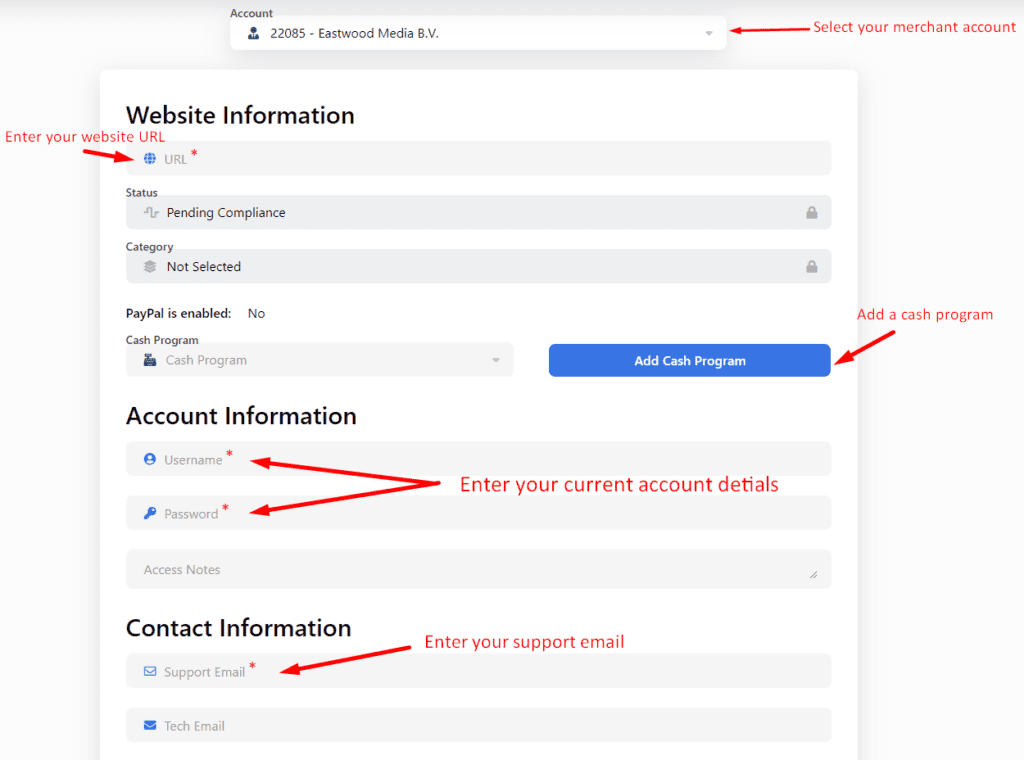
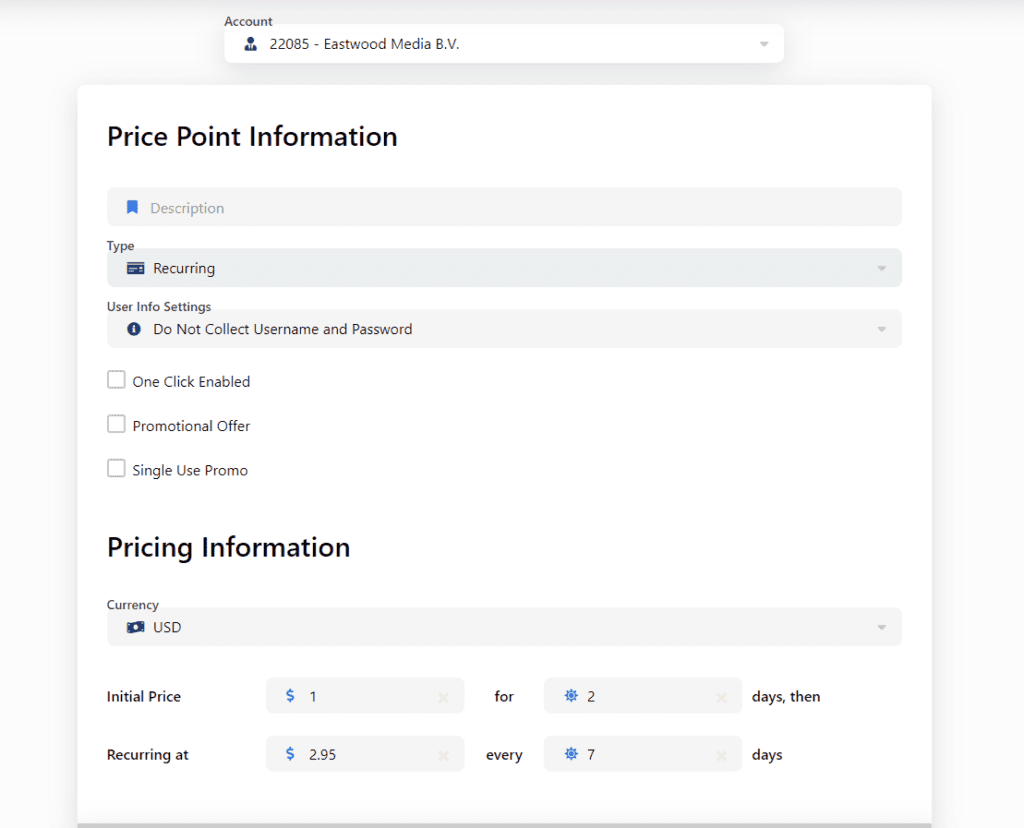
After you have added your website, it is time to add some price points for the website, which can be your renewable subscription plans or one day plan, or one-time payment plan, whichever you want to add to your application.
Navigate My websites > Price Points and add multiple price points that suit your application plans, segpay also supports trail payments. You can get more instructions to add Price Points here.
Step 3: Add postback :
Segpay Payment Gateway also provides a feature called postbacks, which are so-called webhooks that fire when a certain event occurs. There are six types of postbacks available in Segpay, they are:
- Inquiry: Triggered when a username and password is entered on the Segpay payment page, or is passed to Segpay from your system during checkout.
- Enable : Triggered after an approved purchase, where a username and password were entered on the Segpay payment page, or passed to Segpay from your system.
- Disable : Triggered when a subscription reaches its expiration date (or when expiration is requested via chargeback or a refund/cancel request). The Disable postback is a notification to remove access for that member.
- Cancel : Triggered when an account cancellation or refund is requested either by you, Segpay, or the consumer.
- Reactivation : Triggered when an inactive account (previously canceled or expired) is reactivated.
- TransPost: Triggered by any transaction (payment, refund, void, chargeback, etc.) to update your database with the transaction details.
To add a new postback configuration, just click the “Add Postback” button and follow these steps:
Step 1: Select the merchant associated with this set of postbacks
Step 2: In the “Description” field enter a name for this postback configuration.
Step 3: Fill in the input fields of postback that you require
Postback input fields:
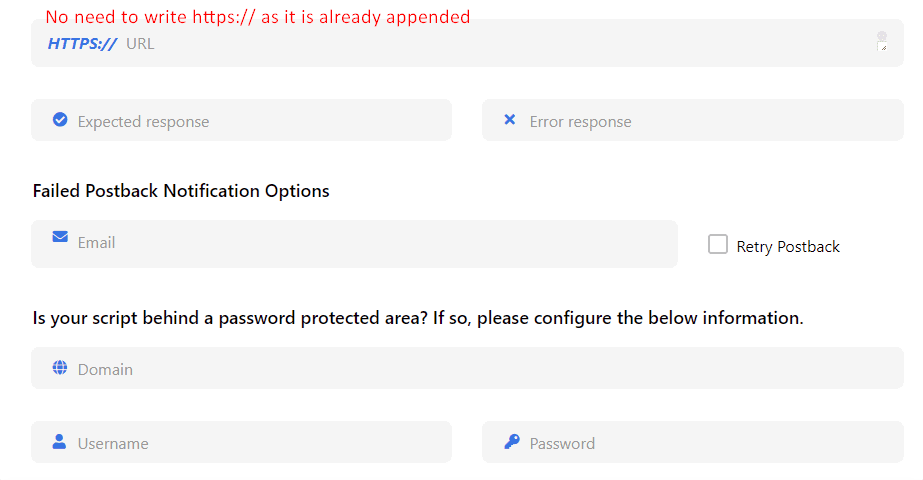
URL: The URL where Segpay sends the postback. Uses SSL by default. (required).
Expected Response: Enter text that is passed back to Segpay to indicate success; e.g., GOOD or OK.(When entering text for response codes, use a simple data string such as OK. Avoid html, spaces, line breaks, etc., which can break the post back.)
Error Response: Enter text that is passed back to Segpay if the action requested was not successful; e.g., NOT_SUCCESSFUL.
Notification Email: Enter an email address to be notified when a postback fails. This field is required if you select the “Retry Postback” option.
Retry postback: Select this checkbox to retry failed postbacks. Member Management postbacks are retried every 5 minutes, for up to one hour. Transaction postbacks are retried every hour, for up to 12 hours.
Domain: Enter the location of the script you entered in the URL section, if the domain is behind a password-protected area.
Username/Password: Enter the username and password needed to access the protected domain above
After saving your postbacks you will be able to see all your postbacks with active and inactive postbacks. As seen in the image
You can see more postback configurations here on this page.
Step 4: Add Packages :
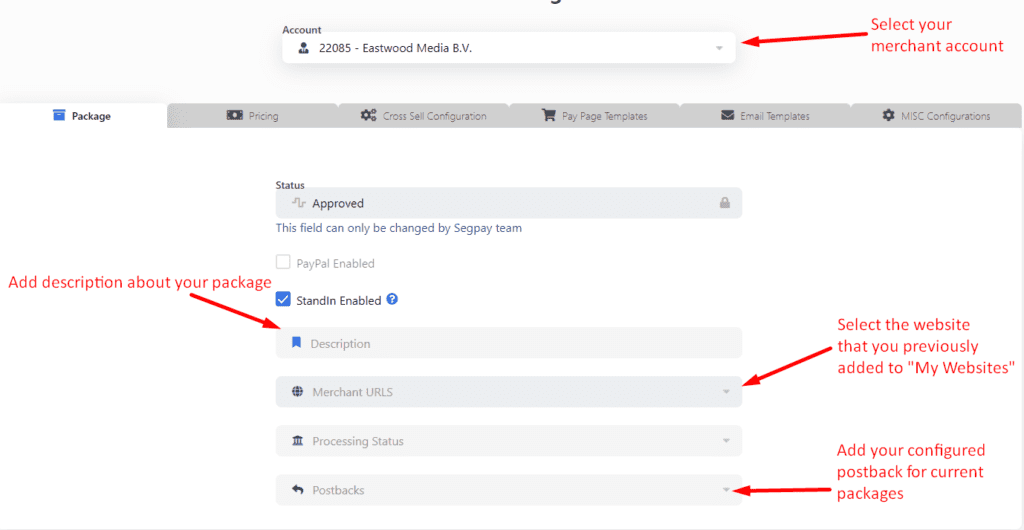
To add a new package, click Add Package and follow these steps:
- Select the merchant associated with this package.
- Select Package Status: This is the status of your package within Segpay’s compliance review process. This field defaults to Approved and is only changed by Segpay.
- Enter a Package Description: Something to identify the package; e.g., “Monthly Membership.”
- Select which URL (website) belongs to this package. The URL you select will be displayed under your Merchant selection near the top of the page.
- Set the Processing Status: This status reflects whether you are processing in test mode or taking live transactions. The statuses available are listed in the dropdown menu (Required field).
- Enable Stand-in: Stand-In processing, turned on by default, triggers when SegPay is unable to communicate with a bank in a credit card transaction. Instead of issuing a decline, SegPay temporarily approves the transaction and then retries it up to three times every two hours. This continues until the bank authorizes or declines the transaction, or the maximum number of retries is exceeded. Stand-in is most useful for small dollar trial subscriptions where the merchant’s cost for providing temporary access is low.
- Enable Dynamic Multicurrency (DMC). DMC allows Europe-based merchants to display pricing in currencies other than USD, EUR or GBP. To enable DMC, select one of two settings
- Select a Postback configuration: Choose one of the postback configurations associated with the selected merchant account. This determines how data is sent back to you after transactions and other events are processed.
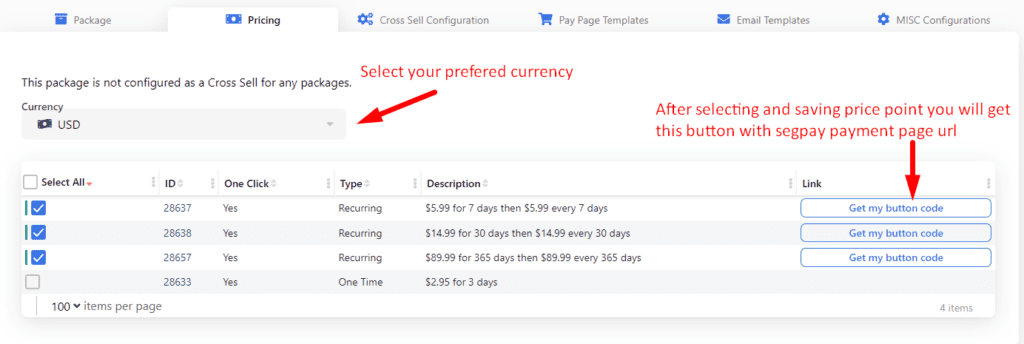
Now navigate to the pricing tab, here you will be able to select all the pricing points that you have set and add them to your current package. After setting the pricing and saving, you will get the payment url from the button which will have the unique ticketID for each price point. This URL will be used to redirect your users to make a successful payment.
Under the Cross Sell Configuration tab, you can select offers that you want to cross-sell as part of this package when consumers are on your payment page.
Under the Pay Page Templates tab you can see which versions of the SegPay payment and receipt pages you are using.
Emails are automatically sent to your consumers in various scenarios, such as to confirm initial signup, refunds, cancellations, etc. Under the Email Templates tab you can see which email templates are being used for the various messages that go out on your behalf.
After you have set your package and saved it, you will be able to see it on the list. You can edit or clone the packages.
You can see further configurations for adding and managing packages on this page.
Bonus Part:
Segpay also allows you to integrate an iframe directly into your application, but you need to have permission for accessing an iframe inside your application, which can be made possible by contacting the tech support of Segpay Payment Gateway.
Segpay also has an API service which is Segpay Reporting Services(SRS) which allows you to make requests for various report data, and to execute a number of consumer support tasks.
Make requests to SRS to get the following data at any time for reporting:
- Active subscribers, by website, with their last/next billing dates
- Canceled subscriptions by website
- Number of visitors to your payment pages, hour by hour, including the visitors’ browser, country, and/or region
- Revenue, detailing all signups, refunds, chargebacks, and more
- Transactions, by website
- List of the websites Segpay is processing for you
- List of email and IP addresses you have blocked
Execute the following consumer support tasks:
- Cancel a membership (effective at the end of the subscription)
- Expire a membership (effective immediately)
- Refund a payment
- Update a consumer’s login credentials
- Change a recurring charge amount
- Extend a membership by pushing the next recurring charge to a later date
- Block an IP (from accessing one of your websites)
- Block an email (from accessing one of your websites)
- Reactivate a previously-canceled membership
Segpay reporting services give you a detailed XML response. You can check all the API lists and all the parameters needed to make a request on this SRS Page.
Hope you get the basic idea to implement Segpay. I will prefer you to go through the official documentation once and also contact the Segpay support team if you find any queries.
Conclusion
Integrating Segpay into your web application opens the door to secure, reliable, and seamless online payment processing. Whether you’re offering subscriptions, one-time purchases, or trial plans, Segpay’s powerful features—like postbacks, dynamic multicurrency, cross-sell configurations, and reporting services—give you full control over your transactions and customer management.
This guide covered all the essential steps to get you started, but for the most accurate and up-to-date implementation, always refer to Segpay’s official documentation and support team.
If you’re looking to integrate Segpay quickly and efficiently with expert guidance, our team at QalbIT can help. From full-stack integration to custom payment workflows, we ensure a smooth setup tailored to your business needs.
👉 Contact us today to get started with your Segpay integration or to schedule a free consultation. Let’s build a better payment experience for your users—together.
Frequently asked questions
Yes, Segpay is really easy to implement, there is not much of complexity in integrating segpay, if you go through this blog step-by-step it won't be difficult.
I must say that, the customer service and tech support are quite impressive, they are always active and ready to provide you a solution.
Yes, you can segpay allows you to integrate a iframe inside your application, but for that you have to contact the tech support to get access to the iframe, which may take some time, but after their verification procedure they will allow you to integrate iframe inside your application.